June 9, 2026
·
Updated November 6, 2026
·
14 min read
Automate Testimonial Collection: Forms, Triggers, Reminders
A beginner's guide to automating testimonial collection: triggers, request emails, reminders, form fields and consent, notifications, approval and publishing, with two tool setups and their November 2026 prices.

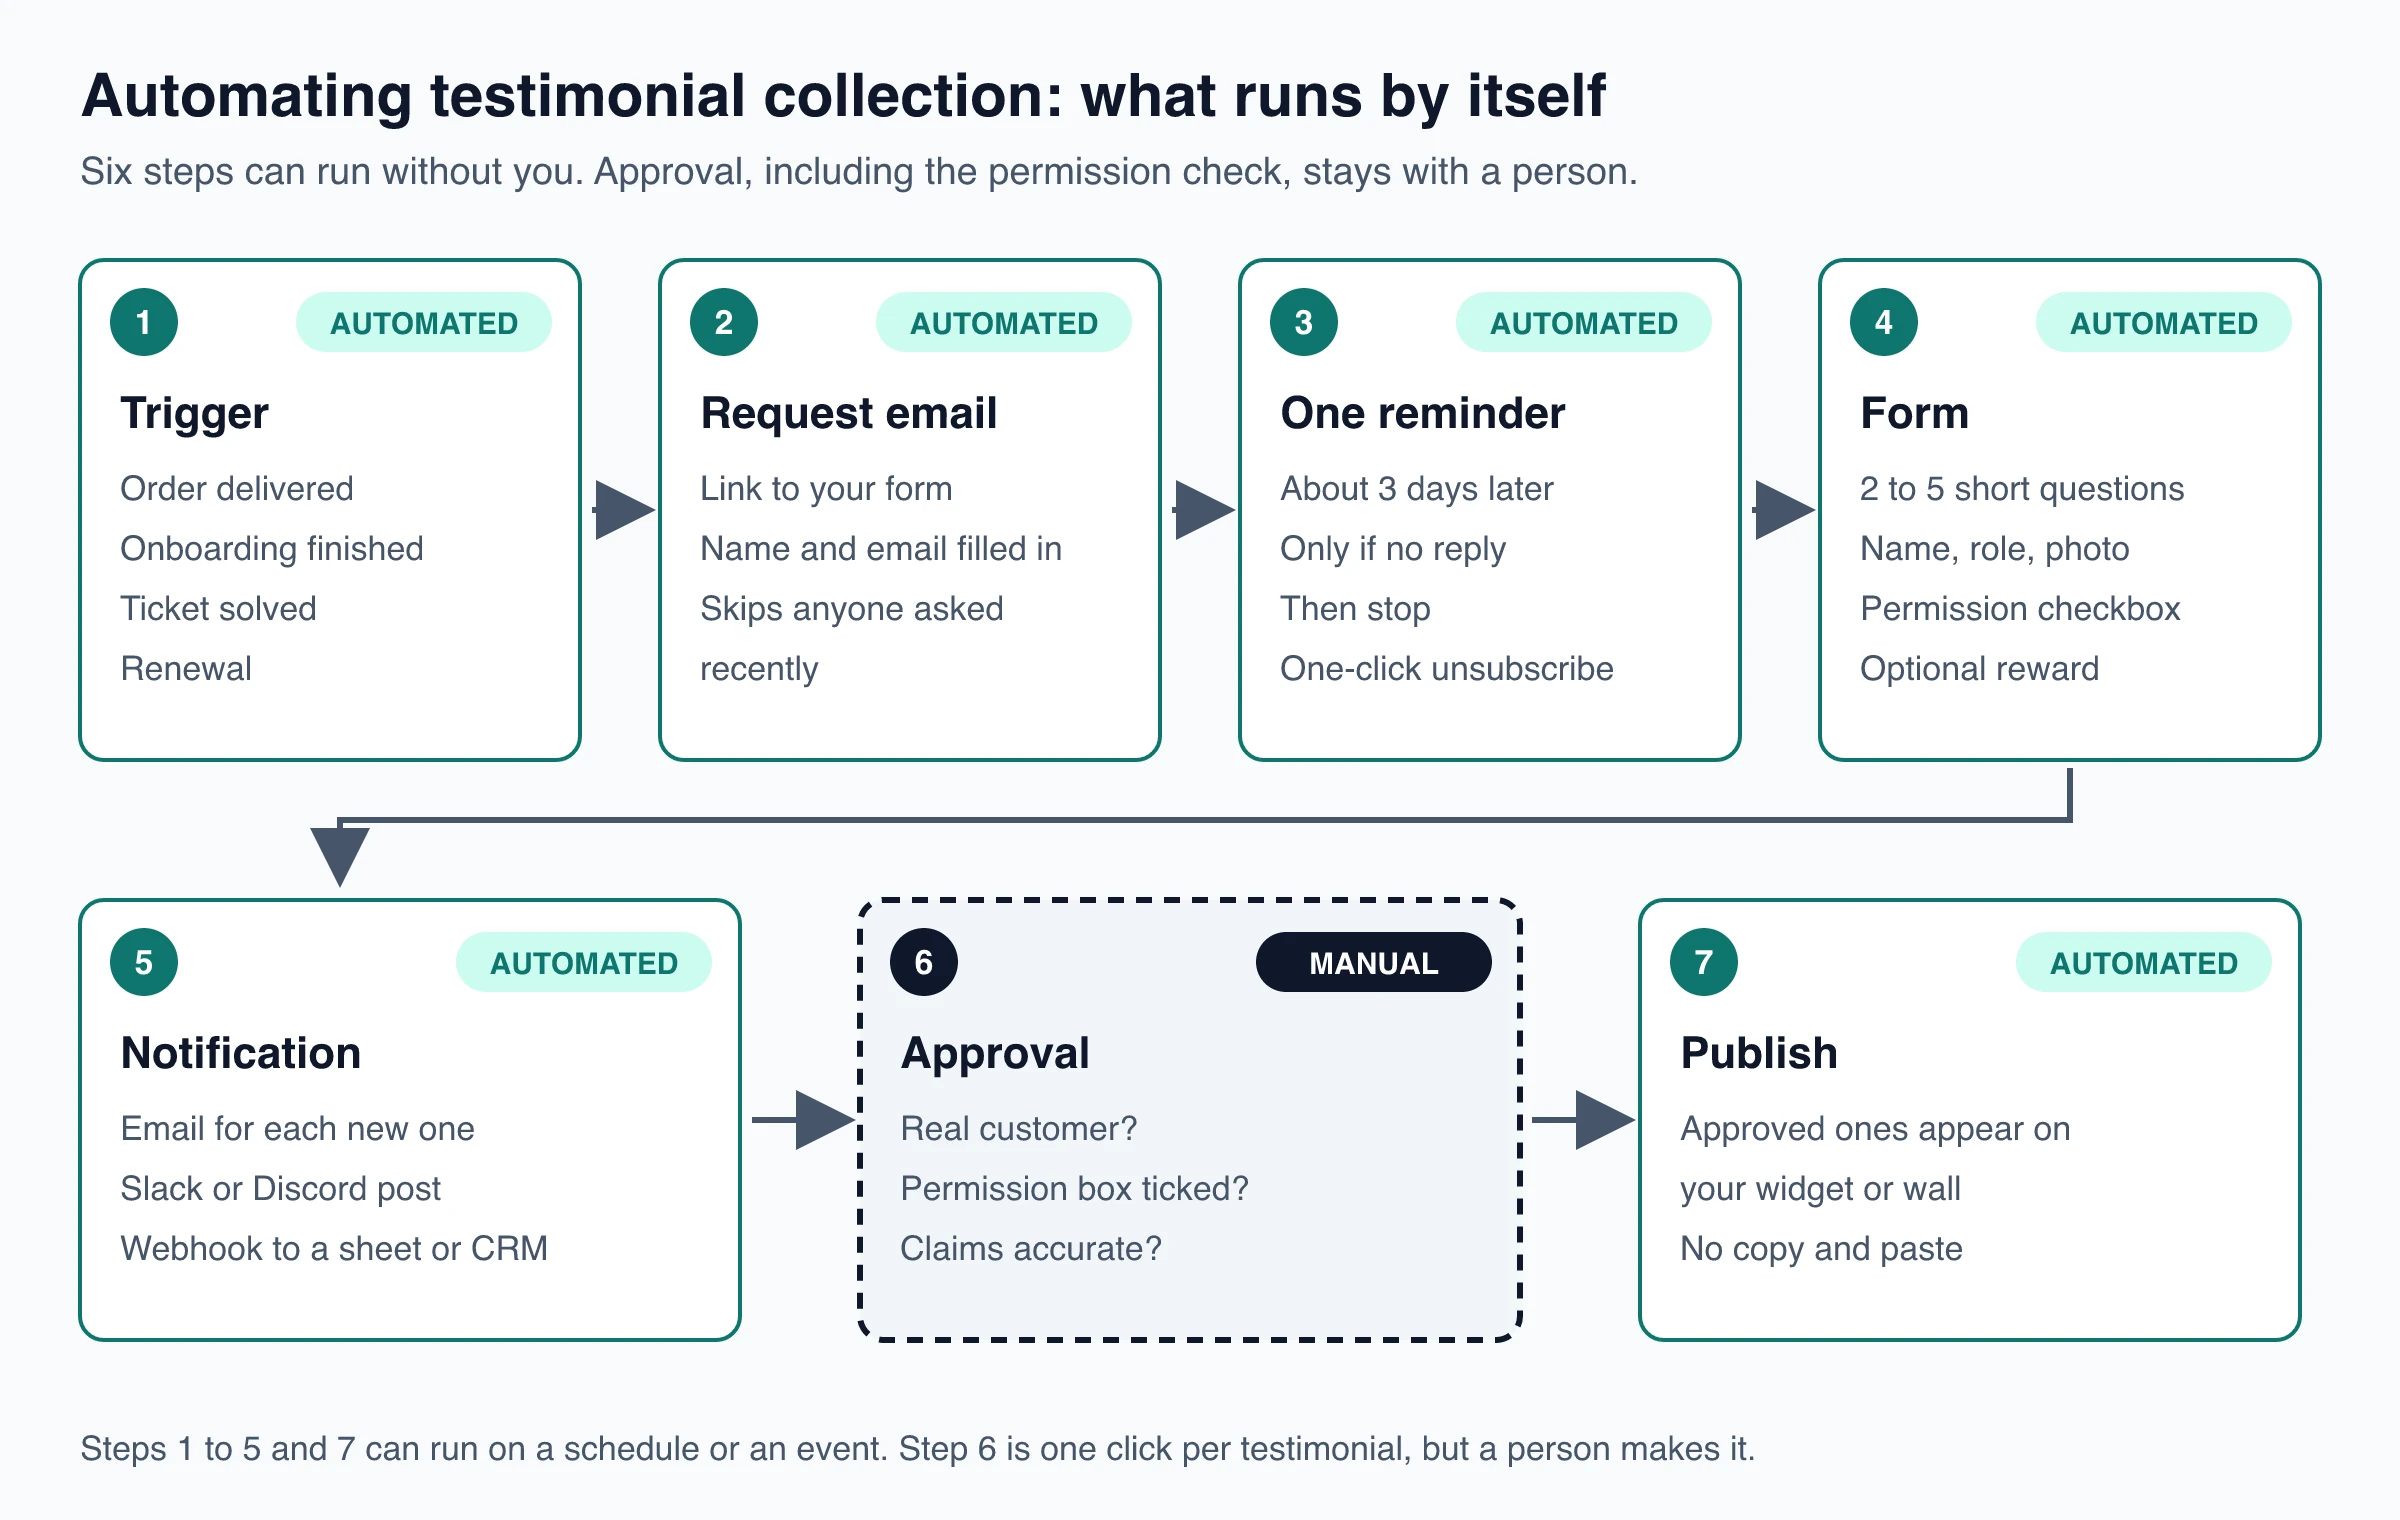
To automate testimonial collection, connect a customer event (an order delivered, onboarding finished, a support ticket solved) to an email that sends a link to a short form, send one reminder a few days later if there's no reply, and get notified when a testimonial comes in. Keep one step manual: a person approves each testimonial, including the permission check, before it goes live. After that, publishing can be automatic too.
This guide splits the process into seven steps and shows which ones a tool should handle. It walks through two working setups (a form builder wired to Zapier or Make, or a dedicated testimonial tool) with prices as of November 2026, and ends with a form checklist you can copy.
What you can automate in testimonial collection, and what to keep manual
A testimonial goes through seven steps between a happy customer and your website. Software can run six of them.
| Step | Automate it? | What the automation does |
|---|---|---|
| 1. Trigger | Yes | Watches for an event: an order delivered, onboarding finished, a ticket solved, a renewal |
| 2. Request | Yes | Sends an email with a link to your form, filling in the customer’s name |
| 3. Reminder | Yes, once | Sends one follow-up a few days later if they haven’t responded |
| 4. Form | Yes | Collects the quote, name, role, photo and a permission checkbox |
| 5. Notification | Yes | Emails you or posts to Slack when a testimonial arrives |
| 6. Approval | No | A person reads it and decides whether it goes live |
| 7. Publish | Yes | Shows approved testimonials on your site without copy and paste |
Approval stays manual because nobody else can check what matters before a quote goes public: is this a real customer, did they tick the permission box, does any claim (“cut our costs in half”) need checking, and does the text include anything private. Approval takes one click per testimonial, and it’s the only step worth keeping on your desk.
The broader process (who to ask, which channels work, what to do with the finished quotes) is covered in how to collect testimonials. This guide focuses on the automation.
Which events should trigger a testimonial request?
Choose events that mean the customer just got what they paid for, and that already exist as data somewhere, so a tool can see them.
| Event | Good for | Where the event usually lives | When to send |
|---|---|---|---|
| Order delivered | Ecommerce | Store platform, shipping tool | A few days after delivery, once they’ve used it |
| Onboarding finished or first milestone | SaaS, apps | Your product’s database or analytics | Right after the milestone |
| Support ticket solved | Any business with a help desk | Help desk | Same day, if the ticket ended well |
| Project delivered or final invoice paid | Agencies, freelancers, consultants | Invoicing or project tool | The day the project closes |
| Renewal or upgrade | Subscriptions | Billing system | Within a day or two |
For stores, wait for delivery rather than checkout: a customer who hasn’t opened the box has nothing to say yet. The trade-offs between a post-purchase email and an in-app prompt are in collecting testimonials after a purchase.
When the automation should not send
Automation asks at the wrong moment just as reliably as the right one. Add filters so a request never goes out when:
- the customer has an open support ticket or an unresolved bug
- there’s a billing dispute, a failed payment or a refund in progress
- a delivery was late or something was missing
- you already asked them recently, or they already gave a testimonial
- they unsubscribed from your emails
One thing not to filter on is how much they like you. Sending requests only to people who scored you 9 or 10 is a form of review gating. Google’s review policy bans selectively asking for positive reviews (Google policy), and even for testimonials on your own site it skews what you collect. Filter on events, not on sentiment.
Recipe 1: a form builder, Zapier or Make, and a spreadsheet
This setup uses tools you may already have. It costs little or nothing at low volume, but you build and maintain every rule yourself. Prices and limits below are from each vendor’s site as of November 2026.
Step 1: Build the form and send answers to a sheet
Use Google Forms (no charge with a Google account) or Tally, whose Free plan allows unlimited forms and submissions under its fair-use rules, plus webhooks and Zapier and Make integrations (Tally pricing).
- In Google Forms, open Responses → Link to Sheets (Google’s instructions).
- In Tally, the Google Sheets integration is free and adds each submission as a new row (Tally help).
Add two columns to that sheet yourself: Status (Pending, Approved, Rejected) and Published (yes or no). The sheet now works as your approval queue.
Watch out for photo uploads in Google Forms: the file-upload question makes respondents sign in to a Google account (Google Forms help), which will stop some customers. Make the photo optional, or use a builder without that requirement. Tally’s Free plan caps uploads at 10 MB per file.
Step 2: Send the request when the event happens
Create a second sheet called Requests with columns for email, name, date requested, date reminded and whether they responded. Then build the automation:
- Trigger: a new delivered order, solved ticket or won deal in the tool where the event lives.
- Action: send an email from Gmail or your email tool with the form link, and add a row to Requests.
Zapier’s Free plan includes 100 tasks a month and two-step Zaps that check for new data every 15 minutes (Zapier pricing). A trigger plus one email fits that, as long as neither app is a premium app. Logging the row as well makes it a three-step Zap, and multi-step Zaps, premium apps and Webhooks by Zapier all start on the Professional plan: $29.99 a month, or $19.99 a month billed yearly, for 750 tasks.
Make’s Free plan gives you 1,000 credits a month, where most actions use one credit, with at least 15 minutes between scheduled runs and at most two active scenarios. Core costs $9 a month billed yearly, or $10.59 billed monthly, for 10,000 credits (Make pricing).
Step 3: Add one reminder
The reminder is where do-it-yourself setups get fiddly, because the automation has to know whether the customer has already answered. The simplest pattern is a scheduled check once a day:
- Find rows in Requests sent three or more days ago, not yet reminded, with no response.
- For each row, look up the email in the responses sheet. If it’s there, mark it responded and skip it.
- Otherwise, send a short reminder and fill in the reminded date. Never send a second one.
In Zapier, this takes more than two steps (a lookup, a filter, an email and an update), so it needs a paid plan; the Delay step, the other common way to build a follow-up, is also limited to Professional, Team and Enterprise (Zapier help). In Make, a scenario scheduled once a day can run on the Free plan if it stays within your monthly credits, though Free allows only two active scenarios, so the request and the reminder use up both.
For the wording of the request and the reminder, use these testimonial request email templates.
Step 4: Get notified, approve, publish
Google Forms can email you on each new response (Responses → More → Get email notifications for new responses), and Tally’s Free plan includes email notifications to you. Read each response, check the permission column, and set Status to Approved.
Publishing is the weak link. A spreadsheet doesn’t put anything on your website, so you either copy approved quotes into your site by hand or add a widget tool that reads the sheet.
What this recipe costs (November 2026): $0 for the request alone on Google Forms or Tally with Zapier Free. Adding a reminder means Zapier Professional ($19.99 to $29.99 a month) or a Make scenario within the free 1,000 credits. Typeform works too, but its Basic plan is $39 a month, or $28 a month billed yearly, for 100 responses a month, and video answers aren’t on Basic, Plus or Business (Typeform pricing).
Recipe 2: a dedicated testimonial tool
Testimonial tools bundle the form, request emails, reminders, the approval queue and the website widget, so the rules from Recipe 1 come built in. You trade some flexibility for far less setup. What to compare between them:
- Requests: can it email customers itself, and can your app or Zapier trigger those emails?
- Reminders and caps: does it stop after one reminder and skip people who already answered or unsubscribed?
- Outbound events: does it send webhooks or Slack messages when testimonials arrive?
- Publishing: do approved testimonials appear on your site without a redeploy?
- Price of the automation itself: several tools put webhooks, Zapier or invites on paid tiers.
As of November 2026, on the vendors’ pricing pages: Senja’s Starter plan ($29 a month) includes Zapier, API and webhooks; Testimonial.to lists webhooks, Zapier and Make on Ultimate ($60 a month per space, or $50 a month billed yearly); Shapo Pro ($29 a month) includes 500 email invites a month; and Famewall Standard ($15 a month) includes Zapier, webhooks, Make, Slack and Discord. For a side-by-side look at those and other tools, see the testimonial collection tools comparison.
Example: the same flow in ShowTrust
Here’s how the seven steps map to ShowTrust (product facts as of November 2026):
| Step | How it works in ShowTrust |
|---|---|
| Trigger and request | Your checkout or onboarding code calls the invites API (POST /v1/projects/:id/invites), or you paste emails or a CSV into email invites |
| Duplicate and opt-out checks | Built in: anyone who unsubscribed, already left a testimonial or was invited in the last 7 days is skipped, so it’s safe to call on every purchase |
| Reminder | One automatic reminder after 3 days if they haven’t responded (you can switch it off), with one-click unsubscribe |
| Form | A hosted collection page with up to 5 questions and a permission checkbox, or a “Leave a testimonial” button that opens the form in a pop-up on your own site |
| Notification | An email for every new testimonial (on by default), Slack or Discord posts with a Review button, and signed webhooks (testimonial.created, testimonial.approved) for Zapier, Make or n8n (setup guide) |
| Approval | Manual: new testimonials wait as Pending until you click Approve |
| Publish | Approved testimonials appear on your embedded wall within about 5 minutes, with no redeploy |
A request from your backend looks like this:
await fetch(`https://api.showtrust.to/v1/projects/${PROJECT_ID}/invites`, {
  method: "POST",
  headers: {
    "x-showtrust-account-id": ACCOUNT_ID,
    "x-api-key": API_KEY,
    "Content-Type": "application/json",
  },
  body: JSON.stringify({ recipients: [{ email: "jane@acme.com", name: "Jane" }] }),
});
The response gives the number of invites sent and lists anyone who was skipped, with the reason.
Limits to know: there’s no native Zapier app, so a no-code trigger calls the same endpoint through Webhooks by Zapier (a paid Zapier feature, Zapier help) or Make’s HTTP module. Invites are email only (no SMS), with exactly one reminder. There are no native CRM integrations and one login per account, so approval can’t be split across a team. Free allows 25 invites a day and Pro 500; video testimonials need Pro.
Do-it-yourself stack vs testimonial tool: which to pick
| Form builder + Zapier or Make + sheet | Dedicated testimonial tool | |
|---|---|---|
| Setup | You build every step, and fix it when one breaks | Form, invites and widget come ready; you configure them |
| Cost at low volume | $0 for requests; a reminder needs a paid Zapier plan or careful Make credit use | Many have free plans; automation features are often on paid tiers |
| One reminder, stop when answered | You build the lookup yourself | Built into tools that send invites |
| Skip unsubscribed or already-asked | You build it | Built into tools that send invites |
| Video testimonials | Limited or not available in general form builders | Common, often on paid plans |
| Publishing to your site | Copy and paste, or another tool | Widget updates after approval |
| Flexibility | Any question, any logic, any destination | Limited to the tool’s form and options |
Pick the do-it-yourself stack if you already pay for Zapier or Make, need custom logic (for example routing testimonials to different sheets by product), or only want a handful of quotes a year. Pick a testimonial tool if you want testimonials on your site continuously and don’t want to maintain the reminder and duplicate rules yourself.
Testimonial form template: fields, questions and consent
Automation sends more people to your form, so the form decides how many testimonials you get. Keep it to one screen on a phone.
| Field | Required? | Why |
|---|---|---|
| Name | Yes | A quote with no name persuades nobody |
| Yes, but filled in from the invite and never shown | Matches the answer to the request and stops the reminder | |
| Role and company | Optional | Adds credibility, especially in B2B |
| Photo | Optional | A face helps, but a required upload costs you submissions |
| Star rating | Optional | Useful for sorting; don’t let it decide who gets asked |
| 2 to 4 question prompts | First one required | Prompts pull out specifics |
| Permission checkbox | Yes | Your record that you may publish it |
Questions that work for most products:
- What were you using or doing before?
- What changed after you started? A number helps if you have one.
- What almost stopped you from buying?
- Who would you recommend it to?
The free testimonial question generator drafts prompts for your own product.
Consent checkbox wording
A good permission checkbox says what you’ll do with the testimonial in plain words. Cover:
- the right to publish the testimonial
- light edits for spelling and length, never meaning
- use of their name and photo
- use of their company name and job title
- where it may appear (website, emails, ads, social posts)
Example: “You can show my testimonial, name, photo and job title on your website and in your marketing. You may fix typos or shorten it, but not change its meaning.”
If someone leaves the box unticked, keep the testimonial private. You can still learn from it.
Keep proof of permission
Consent only helps if you can show it later:
- Keep the time of submission and whether the box was ticked with each testimonial.
- Store the original text exactly as submitted, even if you publish a shortened version.
- Keep customers’ contact details out of anything public.
- Publish only what the permission covers. If they allowed their name but not their photo, show the name only.
Rewards: automate them, disclose them
A thank-you coupon on the confirmation screen is easy to automate. Two rules apply. Never make the reward depend on the testimonial being positive; the FTC rule on consumer reviews bans incentives conditioned on a particular sentiment (16 CFR 465.4), and the same approach is the safe default for testimonials. And when a published testimonial came with a reward, say so near the quote, since the FTC’s Endorsement Guides treat that as a connection to disclose (16 CFR 255.5).
What’s the best way to create a testimonial collection form?
Use a hosted form, keep it to one mobile-friendly page, ask 3 to 5 specific questions, add a permission checkbox, and make video optional. Whether a general form builder or a testimonial tool fits better depends on volume and where the quotes need to end up; the tools comparison linked in Recipe 2 covers that choice in detail.
Guardrails for automated testimonial requests
Automation sends every email you set it up to send, including the annoying ones. Build these in from the start:
- One reminder, then stop. Send it about three days after the request, and only if they haven’t responded.
- A cooldown. Don’t ask the same person again within a set period, such as a week, and never after they’ve already given a testimonial.
- An easy way out. Include an unsubscribe link and honor it in every flow that sends requests.
- A daily cap. If you import a list of past customers, send in batches so a mistake can’t reach everyone at once.
- Test with your own address. Run each automation end to end before switching it on.
- A weekly review slot. Pending testimonials go stale. Fifteen minutes a week keeps the queue short and the wall current.
Set up your first automated testimonial flow this week
- Pick one trigger that already exists as data, such as a delivered order or a solved ticket.
- Build a one-screen form with 2 to 4 questions and a permission checkbox.
- Connect the trigger to a request email, add one reminder after about three days, and filter out anyone you asked recently.
- Send notifications where you already work, and approve new testimonials once a week.
- Show approved testimonials on your site automatically, and add a second trigger only once the first one runs cleanly.
Frequently Asked Questions
- Can you automate testimonial collection for free?
- Yes, at small volume. Google Forms or Tally's Free plan can collect answers into a Google Sheet, and Zapier's Free plan can send a request email when an event happens (100 tasks a month, two-step Zaps). An automatic reminder needs either a paid Zapier plan or a scheduled scenario on Make's Free plan (1,000 credits a month). Several testimonial tools also have free plans; ShowTrust Free sends up to 25 invites a day with one automatic reminder.
- How do I automatically request a testimonial after a purchase?
- Use the delivery or order-fulfilled event as the trigger, wait a few days so the customer has used the product, and send an email with a link to your form. Filter out orders with open tickets or refunds, and skip anyone you asked recently or who already responded.
- How many reminders should a testimonial request get?
- One. Send it about three days after the first email, only if the customer hasn't responded, and stop after that. Ask again only after a new win, such as a renewal.
- Should testimonials publish automatically?
- Publishing after approval can be automatic, so an approved testimonial appears on your site without copy and paste. Approval itself should stay manual: a person checks that the customer is real, the permission box is ticked and the claims are accurate.
- Does a testimonial form need a consent checkbox?
- It should have one. A checkbox that says where and how you will use the testimonial, name and photo gives you a record of permission. Keep the time and the ticked state with each testimonial, and keep unticked ones private.
ShowTrust’s Free plan includes a hosted collection page, email invites with one automatic reminder (25 a day), the approval queue and a wall that updates as you approve. Pro ($4.99/month or $49.99/year per project slot) adds video, 500 invites a day and white-label walls. See plans.
Written by
ShowTrust
Notes from the ShowTrust team on collecting testimonials and building authentic social proof.
Share: