July 13, 2026
·
Updated November 6, 2026
·
15 min read
How to Add Testimonials to Shopify: 3 Ways, Step by Step
A step-by-step guide to adding testimonials to a Shopify store: a theme section (Multicolumn, or a reusable wall built on metaobjects with working Liquid code), a review or testimonial app added as an app block, or a hosted wall such as ShowTrust pasted into a Custom Liquid section. Admin paths and theme details were checked against the Shopify Help Center, shopify.dev and Shopify's theme source code in November 2026.

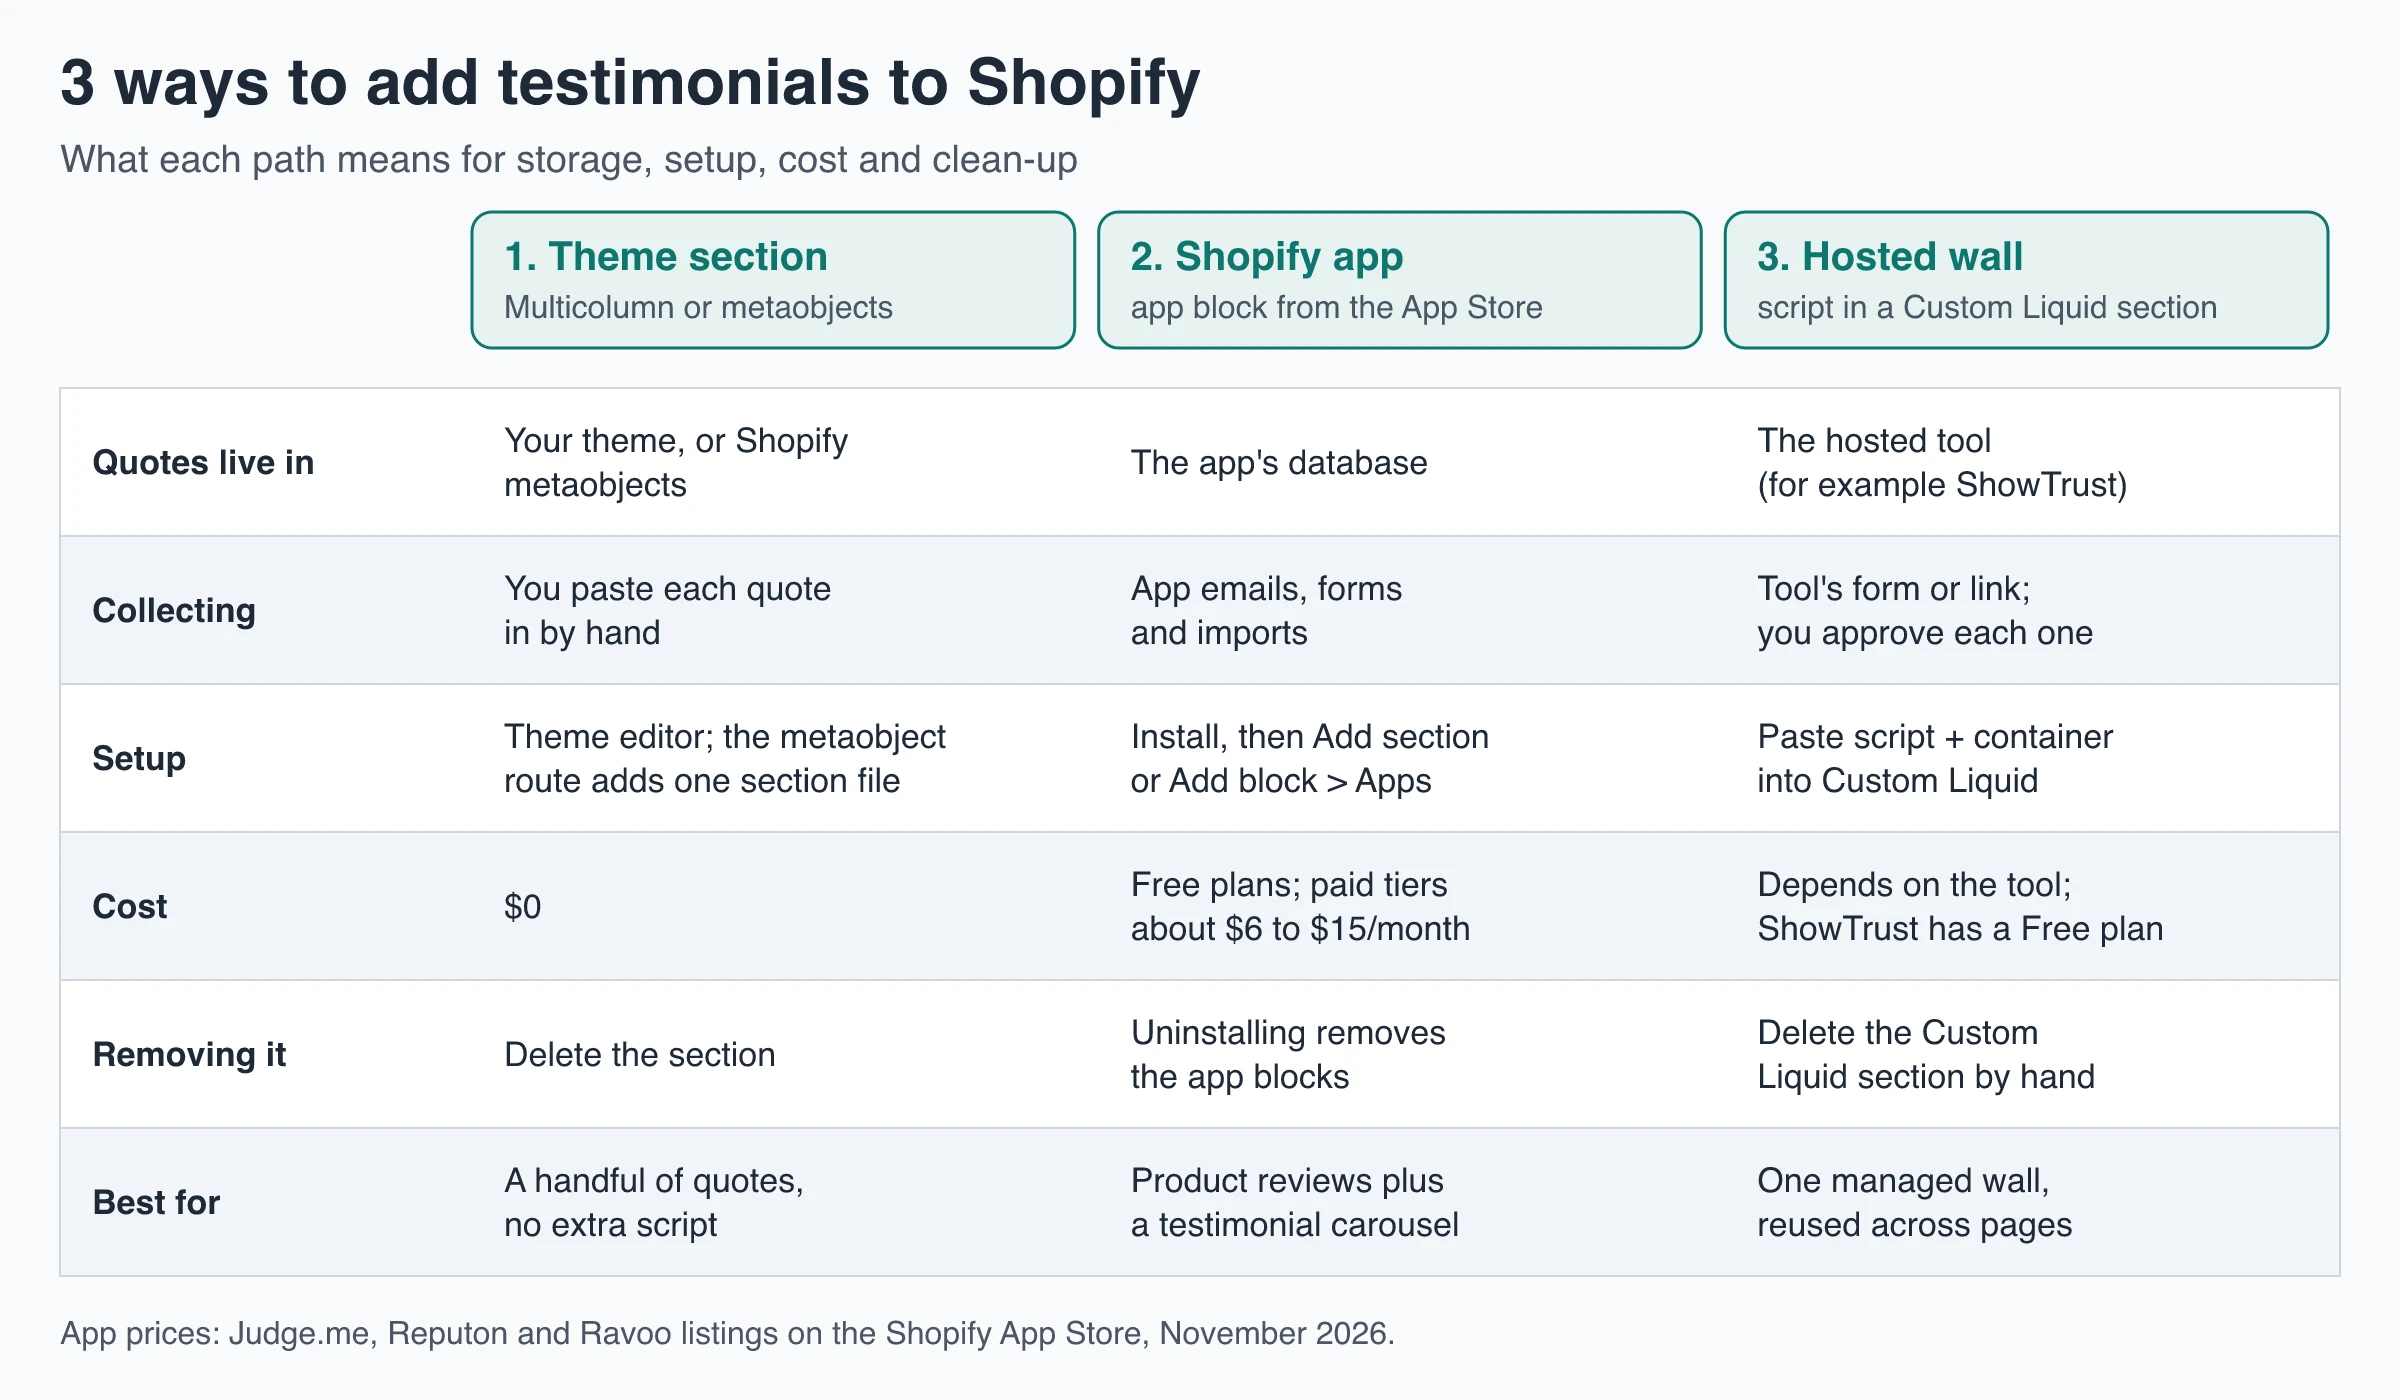
You can add testimonials to Shopify in three ways: with a section in your theme, with a review or testimonial app from the Shopify App Store, or by pasting a hosted testimonial wall's script into a Custom Liquid section. The first and third need no app at all, and none of them needs a developer.
Which one fits depends on where you want the quotes stored and how you plan to collect new ones. Below are the exact admin clicks for each path, a metaobject-powered wall you can paste into your theme, and placement and mobile checks.
Which way should you add testimonials to Shopify?
- Theme section: best when you have a handful of quotes and don’t want another script on the page. You type the quotes into the theme editor, or store them as metaobjects so one list feeds several pages.
- Shopify app: best when you also want product reviews with star ratings, automated review requests and a testimonial carousel from the same tool.
- Hosted wall in Custom Liquid: best when a separate tool collects, approves and lays out testimonials, and you want the same wall of love on Shopify and elsewhere.
If app blocks, app embeds and sections are new to you, the Shopify testimonial widget explainer covers how each mechanism works. This guide sticks to the steps.
Before you start: duplicate your live theme
Every path below edits a theme, so work on a copy:
- In your Shopify admin, go to Online Store.
- Next to your live theme, click the … button and choose Duplicate.
- Make your changes on the copy (named “Copy of” plus the theme name), preview it, then publish it when it looks right.
Shopify’s duplicating themes guide notes that a store can hold 20 themes, so delete an old copy if you hit the limit. If a theme shows a Canvas badge, it opens in Canvas instead of the theme editor, so the editor steps below won’t apply to it.
Option 1: Add testimonials with your theme’s sections
Check your theme first. In the theme editor, click Add section and type “testimonial” into Search sections. Some paid themes ship a dedicated testimonials section; if yours does, fill it in and you’re done.
Shopify’s own free themes don’t. As of November 2026, the source code of Dawn and Horizon, the two reference themes, has no section named Testimonials. Both have a Multicolumn section that works well for quotes, and Horizon also has a Pull quote preset for one large quote.
Set up Multicolumn as a testimonial row
These steps use Dawn’s labels. Shopify’s sections and blocks guide gives the same click path for any theme.
- Go to Online Store, find your duplicate theme and click Edit theme.
- Pick the page from the drop-down at the top (it reads Home page by default).
- In the sidebar, click Add section, search for Multicolumn and select it.
- In the section settings, set Heading to something like “What customers say”, set image Ratio to Circle, and clear the button Label so no button shows.
- Click each Column block. Use Image for the customer’s photo (only with their permission), Heading for their name and Description for the quote. Leave Link label blank.
- Under Mobile layout, choose 1 column, or switch on Carousel so shoppers swipe through the quotes.
- Click Save.
The catch: these quotes live inside that one section. They don’t follow you to a new theme, and putting the same quote on a product page means typing it again. If you plan to reuse testimonials across pages, use metaobjects instead.
Option 1, advanced: a testimonial wall built on metaobjects
Metaobjects are Shopify’s structured content entries. Store each testimonial once under Content > Metaobjects, then show any selection of them on any page through one section file. It’s still a no-app setup, and the testimonials survive a theme change because they’re stored in your store, not in the theme.
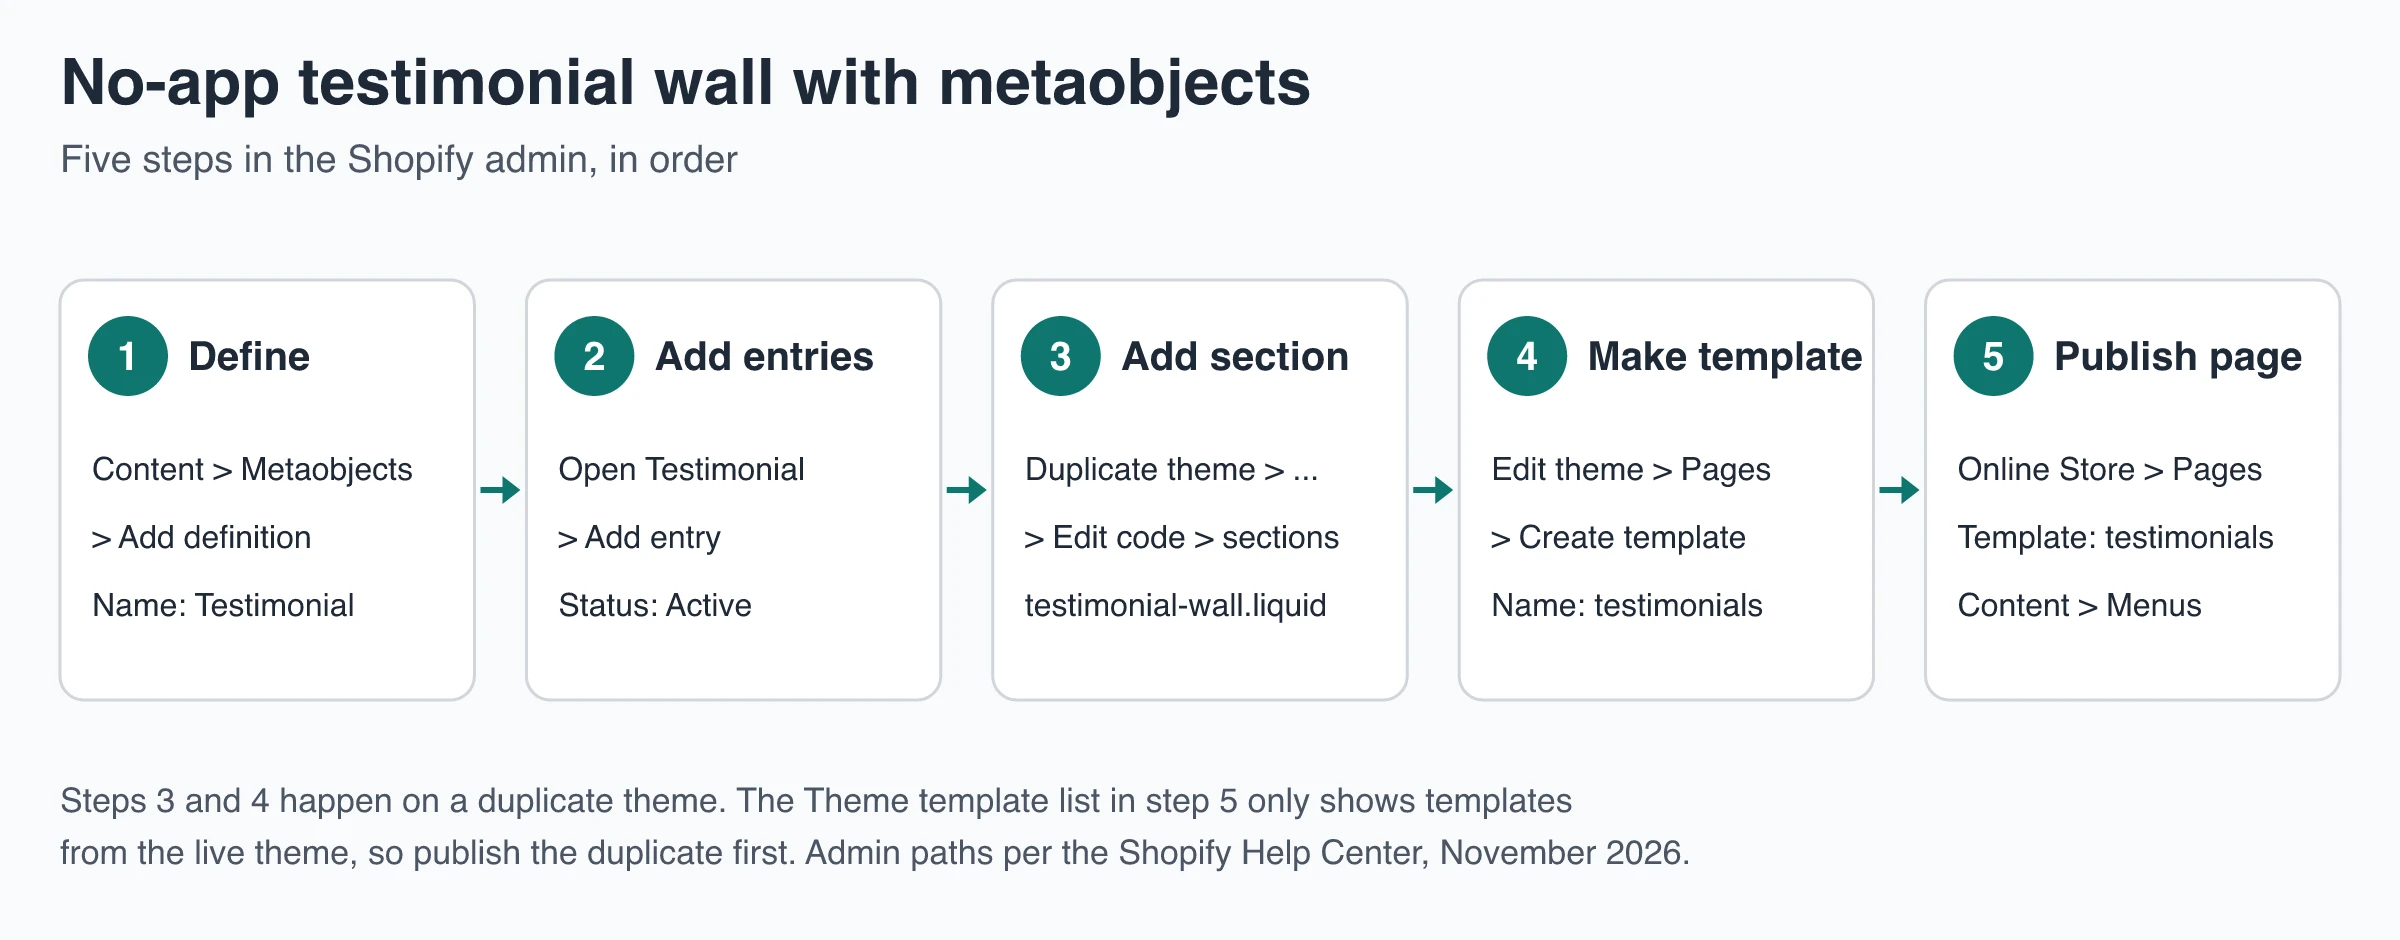
Step 1: Create the Testimonial definition
- In your Shopify admin, go to Content > Metaobjects (or Settings > Custom data) and click Add definition.
- Enter Testimonial as the name. Shopify generates the type
testimonial; keep it, because the code below reads that type. - Click Add field for each field in the table, choosing the type with Select field type.
- Under Access, leave Storefronts selected. Without it, your theme can’t read the entries.
- Click Save.
| Field label | Type | Notes |
|---|---|---|
| Quote | Multi-line text | Required |
| Author | Single line text | Required; first name and initial is fine |
| Detail | Single line text | Optional context, such as “Customer since 2023” |
| Photo | File > Image | Optional; only with permission |
| Rating | Integer | Optional; add a validation of 1 to 5 |
| Product | Product | Optional; links the quote to the product it’s about |
The section code reads the keys quote, author, detail, photo, rating and product. If Shopify generates a different key for a field, edit the code to match. The steps follow Shopify’s metaobject definition guide.
Step 2: Add your testimonials as entries
- Go to Content > Metaobjects and click Testimonial.
- Click Add entry and fill in the fields. Keep the customer’s wording; fix typos, not meaning.
- Leave the status on Active. Per Shopify’s entries guide, Draft entries can’t be published, which makes Draft a handy holding state while you wait for permission.
- Click Save and repeat for each testimonial.
Step 3: Add the testimonial wall section
- On your duplicate theme, click … and choose Edit code (Shopify’s code editor).
- Select the
sectionsfolder, click New file and name ittestimonial-wall.liquid. - Replace the placeholder with the code below and click Save.
{%- liquid
  assign testimonials = section.settings.testimonials
  if testimonials == blank
    assign testimonials = metaobjects.testimonial.values
  endif
-%}

<div class="testimonial-wall page-width" style="--tw-columns: {{ section.settings.columns }};">
  {%- if section.settings.heading != blank -%}
    <h2 class="testimonial-wall__heading">{{ section.settings.heading | escape }}</h2>
  {%- endif -%}

  <ul class="testimonial-wall__list" role="list">
    {%- for testimonial in testimonials limit: section.settings.max_items -%}
      {%- assign rating = testimonial.rating.value | default: 0 -%}
      {%- assign product = testimonial.product.value -%}
      <li class="testimonial-wall__card">
        <figure>
          {%- if rating > 0 -%}
            <p class="testimonial-wall__rating" role="img" aria-label="{{ rating }} out of 5 stars">
              {%- for i in (1..rating) -%}★{%- endfor -%}
            </p>
          {%- endif -%}
          <blockquote>{{ testimonial.quote.value | escape | newline_to_br }}</blockquote>
          <figcaption>
            {%- if testimonial.photo.value != blank -%}
              {{ testimonial.photo.value.preview_image | image_url: width: 96 | image_tag: alt: '', loading: 'lazy', width: 48, height: 48 }}
            {%- endif -%}
            <strong>{{ testimonial.author.value | escape }}</strong>
            {%- if product != blank -%}
              <span>on <a href="{{ product.url }}">{{ product.title | escape }}</a></span>
            {%- elsif testimonial.detail.value != blank -%}
              <span>{{ testimonial.detail.value | escape }}</span>
            {%- endif -%}
          </figcaption>
        </figure>
      </li>
    {%- endfor -%}
  </ul>
</div>

{% stylesheet %}
  .testimonial-wall__list { display: grid; gap: 1.25rem; grid-template-columns: 1fr; list-style: none; margin: 0; padding: 0; }
  @media screen and (min-width: 750px) {
    .testimonial-wall__list { grid-template-columns: repeat(var(--tw-columns, 3), minmax(0, 1fr)); }
  }
  .testimonial-wall__card { border: 1px solid rgba(0, 0, 0, 0.1); border-radius: 12px; padding: 1.25rem; }
  .testimonial-wall__card blockquote { margin: 0 0 1rem; }
  .testimonial-wall__card figcaption { display: flex; flex-wrap: wrap; align-items: center; gap: 0.75rem; }
  .testimonial-wall__card img { border-radius: 50%; object-fit: cover; }
{% endstylesheet %}

{% schema %}
{
  "name": "Testimonial wall",
  "tag": "section",
  "class": "section",
  "settings": [
    {
      "type": "text",
      "id": "heading",
      "label": "Heading",
      "default": "What our customers say"
    },
    {
      "type": "metaobject_list",
      "id": "testimonials",
      "label": "Testimonials",
      "metaobject_type": "testimonial",
      "limit": 50,
      "info": "Pick the testimonials for this spot. Leave empty to show all active entries."
    },
    {
      "type": "range",
      "id": "max_items",
      "label": "Maximum to show",
      "min": 3,
      "max": 50,
      "step": 1,
      "default": 12
    },
    {
      "type": "range",
      "id": "columns",
      "label": "Columns on desktop",
      "min": 1,
      "max": 4,
      "step": 1,
      "default": 3
    }
  ],
  "presets": [
    {
      "name": "Testimonial wall"
    }
  ]
}
{% endschema %}
What it does:
- The Testimonials setting is a
metaobject_listpicker, so each placement can show its own hand-picked entries, up to 50. - Leave the picker empty and the section shows all Active testimonials. Shopify’s metaobject_definition reference caps an unpaginated loop at 50 entries and skips Draft ones.
- Cards stack in one column below 750 px wide and use your Columns on desktop setting above that.
page-widthis Dawn’s container class; in other themes, swap in your theme’s own. - Quotes are escaped, star ratings get an
aria-labelfor screen readers, and photos load at 96 px with lazy loading. - The
presetsentry makes Testimonial wall appear under Add section.
The file passes Shopify’s Theme Check linter. A quicker variant also works: Custom Liquid fields can read global objects such as metaobjects, so a short for loop pasted into a Custom Liquid section will render entries too. It just can’t have its own settings or a {% stylesheet %} tag.
Step 4: Create a testimonials page template
Shopify’s templates guide describes this flow:
- On the duplicate theme, click Edit theme.
- Open the Home page drop-down at the top, choose Pages and click Create template.
- Name it
testimonials, set Based on to your default page template and click Create template. - Click Add section, choose Testimonial wall, leave the picker empty to show everything, and click Save.
Now preview the duplicate, check it on mobile (see below) and publish it. Publishing matters for the next step.
Step 5: Publish the page and link to it
- Go to Online Store > Pages and click Add page.
- Add a title such as “Customer testimonials”, a two-line intro, and keep Visible selected.
- In the Online store section, open Theme template and pick testimonials. The list only shows templates from your live theme, which is why the duplicate had to be published first.
- Click Save.
- Go to Content > Menus, open your footer or main menu, click Add menu item, enter a name, choose Pages in the Search or paste a link field, pick the page, click Add, then Save menu.
Shopify’s menu guide recommends picking the page from the list rather than pasting its URL, which can break the link.
Option 2: Add testimonials with a Shopify app
Review and testimonial apps store testimonials in their own database, send review requests for you and add a display block to your theme. Apps with the Built for Shopify badge must use theme app extensions, so their blocks are removed automatically when you uninstall.
Install the app and add its block
- Install the app from the Shopify App Store and read the data it asks to access. A testimonial slider rarely needs order data.
- Add or import testimonials in the app and turn on manual approval before anything goes live.
- Go to Online Store, click Edit theme on your duplicate and pick the template.
- Click Add section (or Add block inside an existing section) and pick the app’s testimonial or carousel block under Apps.
- For floating badges or popups, click the App embeds icon in the sidebar and switch the app on instead.
- Click Save and check the page on a phone.
Shopify’s apps in themes guide covers both flows.
Three apps worth comparing
Prices are from the Shopify App Store listings as of November 2026, converted to USD at the exchange rate each listing states (the store shows your local currency). All three carry the Built for Shopify badge.
- Judge.me Product Reviews: product and store reviews with a testimonials carousel. Forever Free plan with unlimited reviews; Awesome is about $15/month with a 15-day trial.
- Reputon Testimonials Slider: a dedicated slider. Free Demo plan (1 widget, up to 4 testimonials); Standard is about $5.99/month or $54/year for up to 150 testimonials, YouTube and TikTok videos and a form page.
- Ravoo: Reviews & Testimonials: testimonials plus product reviews. Free plan with 1 widget and 10 testimonials; Pro is about $7.99/month for unlimited widgets and testimonials, CSV import and export and no Ravoo branding, with a 7-day trial.
Pick a review app such as Judge.me if you need per-product ratings. If you only want a curated set of store-level quotes, a dedicated testimonial app or one of the no-app routes is lighter.
Option 3: Paste a hosted testimonial wall into Custom Liquid
Hosted testimonial tools keep collection, approval and layout in their own dashboard and give you a snippet. Many have no Shopify app at all, and Shopify doesn’t need one: Dawn and Horizon both include a Custom Liquid section whose Liquid code field outputs whatever HTML or script you paste. Dawn’s and Horizon’s product information sections also accept a Custom Liquid block, which puts the wall next to the buy button.
ShowTrust works this way. It has no Shopify app, no app block and no Shopify review sync; on Shopify it installs only as a script plus a container div pasted into Custom Liquid.
Step by step with ShowTrust
- In ShowTrust, collect testimonials through your hosted collection page (
showtrust.to/your-name) or import them (CSV, X posts or pasted review text), then approve the ones you want to show. Your first project starts with six demo testimonials that appear on the wall until you click Clear demo data, as the testimonials docs explain. - Open Wall of Love, pick one of the six layouts and copy the Embed Script and Add Container snippets.
- In Shopify, go to Online Store, click Edit theme on your duplicate and pick the template: Home page, a product template or your page template.
- Click Add section, search for Custom Liquid and select it.
- Paste both snippets into the Liquid code field, then click Save.
The pasted code looks like this (the dashboard fills in your project ID):
<script>
  (function() {
    window.SHOWTRUSTTO_WIDGET_CONFIG = { projectId: 'YOUR_PROJECT_ID' };
    var script = document.createElement('script');
    script.src = 'https://app.showtrust.to/showtrustto-widget.js';
    script.async = true;
    document.head.appendChild(script);
  })();
</script>

<div id="showtrustto-widget"></div>
Per the Wall of Love docs, the script is under 8 kB, loads async and renders the wall inside a shadow root, so theme CSS and wall CSS stay separate unless you add allowCssOverride: true. Only approved testimonials appear; new approvals can take about five minutes to show because the widget is cached.
What the Custom Liquid route can’t do
- It doesn’t pick testimonials per product. A ShowTrust project has one wall design and can show only certain tags, but that choice applies everywhere the wall is pasted. A different selection on product pages means a second project.
- Nothing removes it for you. If you stop using the tool, delete the Custom Liquid section from each template yourself.
- Testimonials stay in the hosted tool, not in Shopify, and they aren’t Shopify product reviews.
If you’d rather not build a Shopify page at all, ShowTrust also hosts a public wall page at showtrust.to/w/your-name that you can add to a menu as an external link. The embedding guide covers script vs iframe embeds and layout shift in more depth.
Where to place testimonials on your Shopify store
Every path above adds testimonials per template, so decide where they go first. The guide on how a testimonial wall works for ecommerce buyers explains how shoppers use them; three placements cover most stores:
Home page
Add a short row of three to six quotes below the hero or next to featured products, for first-time visitors deciding whether the store is real. Quotes about delivery, packaging, sizing and support work better here than vague praise. Link the row to your full testimonials page.
Product pages
Product reviews with star ratings usually own this spot. A store-level testimonial still helps near the buy button when it answers a common worry such as shipping time or returns. Edits to the default product template apply to every product that uses it; to target a subset, create a second product template and assign it to those products. With the metaobject section, pick testimonials that mention that product in the section’s picker.
A dedicated testimonials page
A full wall works best on its own page, linked from the footer, the About page and your home page row. Use a static grid or masonry layout there: visitors can scan more quotes at once than in a testimonial slider. If you do use a carousel that moves on its own, WCAG’s Pause, Stop, Hide criterion requires a way to pause it when it runs longer than five seconds, and the W3C’s carousel tutorial shows accessible patterns.
How to check your testimonials on mobile
Most testimonial layouts are designed on a desktop screen. Check the phone view before you publish the duplicate theme:
- Theme editor: click the mobile button in the menu bar to switch the preview to a phone layout, as the theme editor’s features overview describes. Click it again to return to desktop.
- A real phone: go to Online Store, open the duplicate theme’s … menu, click Preview, then click the link button in the preview bar to copy the link and open it on your phone. Per Shopify’s theme preview guide, visitor preview links expire after two days.
- Speed: run the page through PageSpeed Insights on mobile before and after adding testimonials.
What to look for on the phone:
- Cards stack in one column, or the carousel swipes smoothly and can be stopped.
- Quote text is readable without zooming, and long quotes don’t push the buy button far down a product page.
- Nothing scrolls sideways, and photos aren’t oversized.
- The page doesn’t jump when a script-loaded wall appears. Giving the container a
min-heightclose to the wall’s height reduces the shift. - The wall shows real testimonials, not demo cards or placeholder text.
If a block is missing, an app embed isn’t showing or the wall appears twice, the Shopify widget troubleshooting guide walks through the usual causes.
Before you publish: permission, disclosure and Google stars
A testimonial is a marketing claim made with a customer’s name on it, so settle these before launch:
- Permission: get the customer’s OK to use their name, photo and words. ShowTrust’s collection page has a permission checkbox (Don’t ask, Optional or Required) that’s recorded with each testimonial; see the collection page docs.
- Incentives: if you gave a discount or free product for feedback, the FTC’s Endorsement Guides FAQ says that connection should be disclosed.
- Typical results: a quote describing an unusual result needs context about what customers generally experience, per the same FAQ.
- Edits: fix spelling and length, never meaning. Keep the original text and the date you received it.
- Freshness: retire quotes about discontinued products and review the wall when your best sellers change.
Don’t expect Google star ratings from testimonials: the review snippet guidelines treat reviews a business hosts about itself as self-serving, so they aren’t eligible. ShowTrust’s widget doesn’t add review markup.
Your Shopify testimonial checklist
- Duplicate the live theme and work on the copy.
- Choose a path: Multicolumn for a few quotes, metaobjects for a reusable no-app wall, an app for product reviews plus testimonials, or a hosted wall in Custom Liquid.
- Launch with approved testimonials you have permission to use, and clear any demo or placeholder content.
- Place a short row on the home page, a relevant quote on product pages and the full wall on its own page.
- Check the phone view in the editor and on a real phone, then run PageSpeed Insights.
- Publish the theme, assign the page template and add the page to your footer menu.
Frequently Asked Questions
- Can I add testimonials to Shopify without an app?
- Yes. Use your theme's testimonials or Multicolumn section, store testimonials as metaobjects and show them with a section file, or paste a hosted testimonial wall's script into a Custom Liquid section. None of these installs an app.
- Does the Dawn theme have a testimonials section?
- No. As of November 2026, Dawn's source code has no section named Testimonials, and neither does Horizon. Use the Multicolumn section, with the customer photo as the image, their name as the heading and the quote as the description.
- How do I create a testimonials page on Shopify?
- Create a page template in the theme editor (Pages, then Create template), add your testimonials section or Custom Liquid section to it, and publish the theme. Then add a page under Online Store > Pages, choose that template under Theme template, and link the page from a menu.
- Why doesn't my new template appear in the Theme template list?
- The Theme template list on a page only shows templates from your live theme. If you created the template on a duplicate theme, publish that theme first, then assign the template.
- Do Shopify testimonials show star ratings in Google?
- Usually not. Google treats reviews a business hosts about itself as self-serving, and those aren't eligible for review stars. Product reviews with product markup are handled differently.
- Does ShowTrust have a Shopify app?
- No. ShowTrust has no Shopify app, app block or review sync. On Shopify you paste its script and container into a Custom Liquid section or a theme file.
Want a testimonial wall you can paste into Custom Liquid without installing an app? ShowTrust is free for one project with unlimited testimonials and a small credit link you can switch off; Pro is $4.99/month or $49.99/year per project slot and adds white-label and video testimonials.
Written by
ShowTrust
Notes from the ShowTrust team on collecting testimonials and building authentic social proof.
Share: